Getting Started
The easiest way to understand EGO, is to simply use it!
Below is a description of how to get Ego quickly up and running, as well as a description of how Ego works and some important terms.
Quick Start
The goal of this quick start is to get a working application quickly up and running.
Using Docker:
- Download the latest version of Ego.
- From the Ego root directory, set the API_HOST_PORT where Ego is to be run, then run docker-compose:
$ API_HOST_PORT=8080 docker-compose up -d
Ego should now be deployed locally with the Swagger UI at http://localhost:8080/swagger-ui.html
Alternatively, see the Installation instructions.
How Ego Works
- 1. An Ego administrator configures Ego.
- Registers a unique client-id and application password for each application that will use Ego for Authorization.
- Creates a policy for every authorization scope that an application will use.
- Registers users and groups, and sets them up with appropriate permissions for policies and applications.
- 2. Ego grants secret authorization tokens to individual users to represent their permissions.
- Authorization tokens expire, and can be revoked if compromised.
- Individuals can issue tokens for part or all of their authority, and can limit the authority to specific applications.
- Users (and programs operating on their behalf) can then use these tokens to access services.
- 3. Individual services make a REST call to EGO to determine the user and authority represented by a token.
- Makes a call to Ego’s check_token endpoint and validates the user’s authorization to access the requested services.
Terms Used in Ego
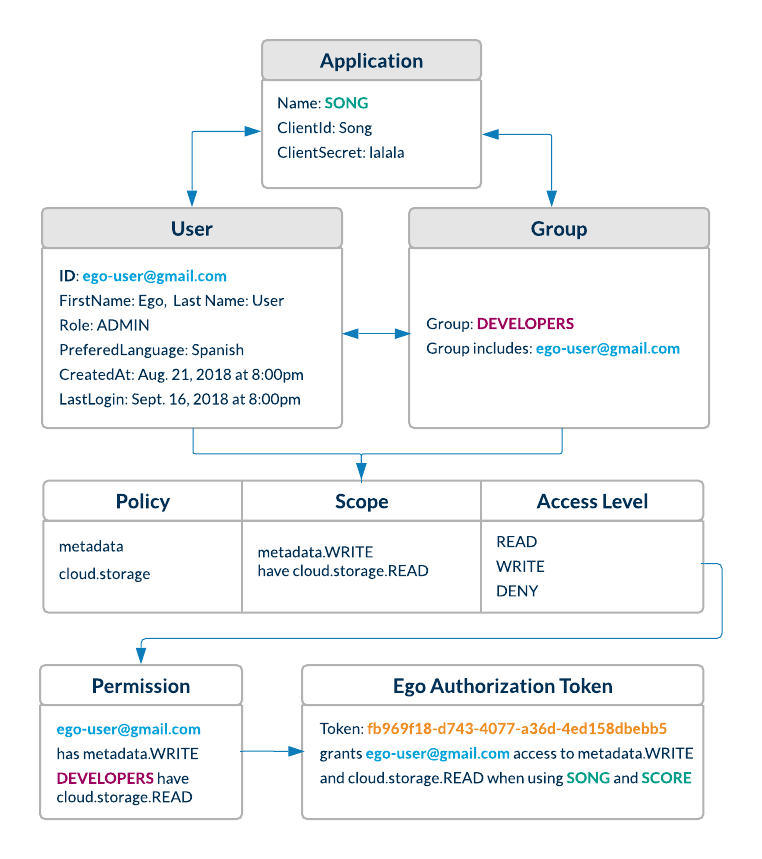
- User
- A user is any individual registered in Ego who needs to authorize themselves with Ego-aware applications.
- Admin
- An admin is a power user whose role is set to ‘ADMIN’. Only admins are authorized to register users, groups, applications & policies using Ego’s REST endpoints.
- Group
- A group of users with similar properties. Admins can create new groups and add users to them. They can then assign permissions to an entire group which will be reflected for each user in that group.
- Policy
- A policy is a scope or context for which an application may want to grant a user or group READ/WRITE/DENY permissions.
- Permission
- A user or group can be given READ/WRITE/DENY permissions for a particular policy.
- Application
- An application is a third party service that registers itself with EGO so that EGO can authorize users on its behalf. Upon registration, the service must provide a client_id and client secret.
- Application Authentication Token
- This a Basic JWT token which encodes a client id and secret, and authorizes an application to interact with Ego. This is passed in the authorization request header when an application uses the check_token endpoint in order to check a user’s token.
- User Authentication Token
- This is a Bearer token which encodes user information, and is passed to a user when they are authenticated through OAuth single sign-on. This Bearer token is passed in the request authorization header whenever the user wants to access Ego’s resources. If the JWT denotes that a user has an ADMIN role, they are permitted to create and modify resources (users, groups, permissions, policies).
- This is a random token which is generated to authorize a user for a specific scope, in the context of an application.
Play with the REST API from your browser
If you want to play with EGO from your browser, you can visit the Swagger UI located here :
https://ego.overture.cancercollaboratory.org/swagger-ui.html